Thursday, August 11, 2005


Well, here's the first attempt on the Victorian bonnet. I have a basic pattern for this, embellished it a bit on the back where the seam is. I have over-corrected the sharpness on these pics to show the pattern, the thread is just some I had here and it is metallic. I am starting on the cape, above, and will see how it comes out. I went to HL today and bought some LusterSheen, I might re-do it in that thread, to see the end result.

Thanks to all who commented and helped on the "Victorian" stitch question!!!

Sunday, August 07, 2005

THANKS, THANK YOU AND THANKS AGAIN!

To ALL on the CP group who helped me with fine suggestions and advice on the Round Ripple Baby Afghan!! Whatta great bunch of folks! And I seriously mean that! Thank you for sending me the pattern that wasn't available anymore and also for all the help, on and off-list for the middle, I was having problems. I will update on the progress!

Also, where can I get one of those little things that show the percentage of completion on individual projects? Know what I mean? I've seen them on other blogs and would like to start one myself.

Started on a sweater last night, half-way thru. I have SO many things to finish and want to do.
As soon as I can get the thread and needle, I am trying my hand at IRISH Crochet booties that are just gorgeous!.

Still in the market for a Christening gown pattern for 1st grandchild. Making a WILD baby blanket, y'all will have to see it, as well as some experimetal stuff with BOOTS, yes , I said BOOTS, and hackey sacks, and seriously considering collaberating with daughter to see if she would wear an Irish crochet wedding dress. No, she's not engaged, but I am talking for hope chest. I haven't forgotten the little crochet-in-the round animals, or the Cathedral Rose Window Afghan, ther's just so many things to do and finish, but so much fun as well!! I'll be posting pics all this week.

Enjoy your lives, folks, be thankful for every day you have, whether it is good or bad. As long as you are alive, there's hope and faith, and love to give. Just a thought.

Friday, August 05, 2005

TWO job offers and a tapestry lesson.....

Hello to all! I just went to test for a job at Sara Lee Bakery Groups, which is a GOOD job. The lady said she was recommending me for the job and I should know Monday. Then, as soon as I got home, I was called for an interview at a new plant here, in which I applied for a job drivng a fork-lift (I have done this before). So I have to talk to them Monday as well. Decisions, but good ones. They are both good jobs with good benefits. I love being a sub teacher but it pays practically nothing.

Anyway, to the tapestry lesson. I found a page that explains it, and am gonna link you up to it. here it is:

http://iweb.tntech.edu/cventura/rightstitches.html

I have another page to post with info on this as well.

Tapestry crochet is simple once you do it once or twice, try it....you may fall in love with it like I did!

Wednesday, August 03, 2005

And since I can't get this to the profile.....


This is me.

My baby has a New Job!! LOL!


rachael Yep, that's a Papa John hat on her head, she's a full-fledged pizza delivery person now! First day! Isn't she sweet!! LOL!

SHAWL PATTERN, PART 2

Sorry for the delay folks, but real life does call! LOL! Anyway, I am going to try to go ahead with the pattern now. Here we go.

Row 6. Add your second colour. You could have done this, as I do, in the previous row and bring it up to start this row. With your 2nd colour, do 1 DC in each of the next two DC, then 2 DC in the original colour. So you will be doing two DC of each color, alternating until you get to the end o the row. Bring both colours up with the ch 3 at the end of the row, turn.

Row 7. DC in each of the stitches across the row in the 2nd colour, binding off, or simply cutting and ending the 1st colour after the first several stitches. Ch 3 at the end of the row, turn. You will have only the 1st colour used on your hook now.

Row 8. Work 1 DC in each stitch all the way across, adding the 2nd colour in the last few stitches. Ch 3, turn. This row will be in the first colour used.

Row 9. Now the actual design begins. Don't let this pattern scare you, when you do it once, you will see how simple it actually is.

*With 1st colour, DC2. 2nd colour, dc 10. Continue this* sequence all across the row. Ch3 at the end, turn, continuing with both colours.

Row 10. *2 DC in 1st colour, 2 DC in 2nd colour, 4 DC in 1st colour, 2 Dc in 1st colour, 2 DC in 2nd colour. That's the sequence for this row, repeat from * all the way across, ch 3, turn, still bringing both colours up.

Row 11. Repeat Row 10

Row 12. *With 1st colour DC 2, 4 DC with 2nd colour, 2 DC with 1st colour, 2 DC with 2nd colour, repeat from * across, Ch 3 at the end, turn, bringing up both colours.

Row13. *2DC with 1st, 2 DC with 2nd, 6 DC with 1st, 2 DC with 2nd, repeat from * across the row, ch 3, turn, bringing up both colours.

Row 14. Repeat row 13.

Row 15. *2 DC with 1st colour, 10 DC with 2nd, repeat from * across the row, ch 3, turn, bringing both colours up.

Row 16. Dc in each stitch across with 1st colour, binding off 2nd colour after a few stitches into the row. Add the 2nd colour a few stitches from the end of the row, ch 3, turn, bringing both colours up.

Row 17. DC in each stitch across with 2nd colour, binding off the 1st colour after a few stitches, work all the way across, add the 1st colour a few stitches from the end, ch 3, turn, bringing up both colours.

Row 18. Repeat Row 6, ch 3, turn, bringing up both colours.

Row 19. DC in each stitch across with 1st colour, binding off 2nd colour a few stitches into the row. Ch 3, turn, with only first colour working now.

Row 20. Now you are working on the band described in yesterday's post. Continue with the cross over stitch row, then the DC row, until you have it the width you want.

Then repeat the pattern from Row 6.

And there you go. I know I have probably done a horrid job writing this, if anyone has suggestions or corrections, please add them!! Enjoy!

Tuesday, August 02, 2005

SHAWL PATTERN

O.K., here’s the pattern, as best as I can write it. Maybe someone can help me figure exactly the number of foundation chains so the people who are new at this don’t have a hard time trying to add or subtract.

*As far as I know, there are no patterns like this available with a copy-right. The book that I had 20-something years ago had this same disclaimer in it. If this is a copy-righted pattern, please contact me with proof and I will remove the pattern.

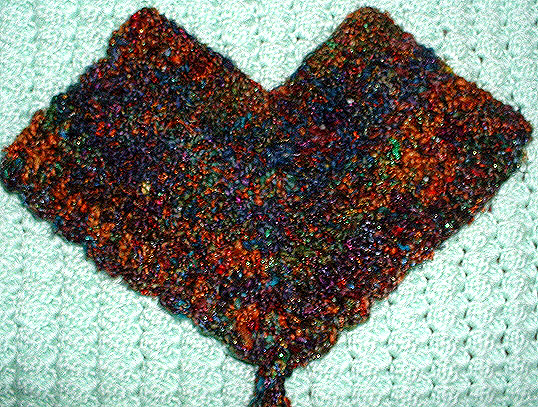
Ch 212. Chain 2, turn.
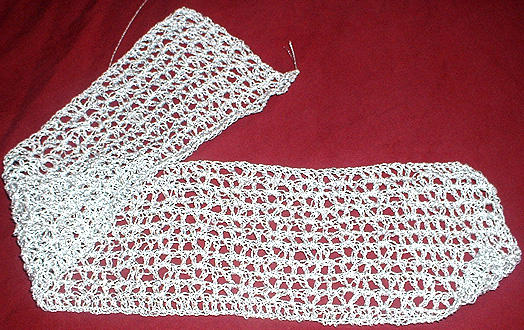
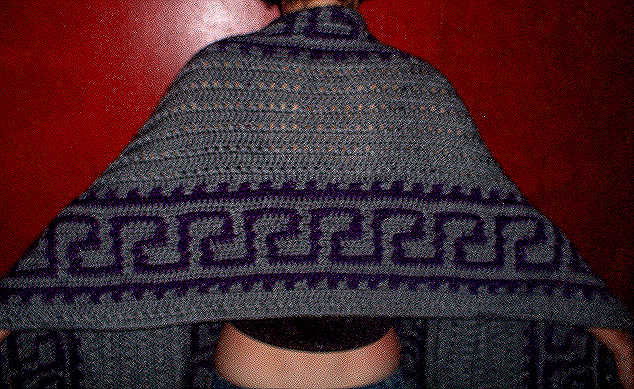
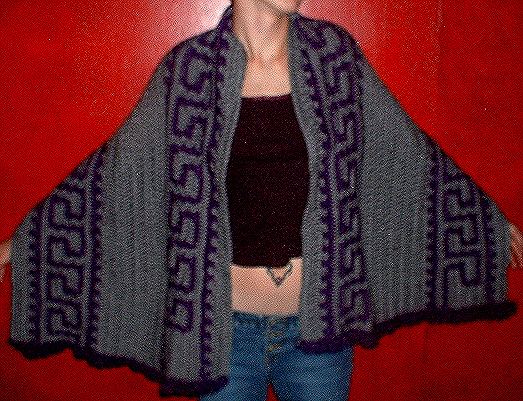
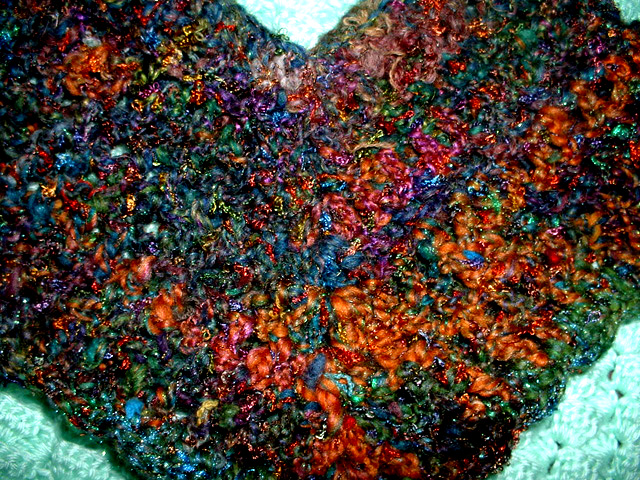
Now this makes a shawl of approximately 6 ft long. This is where I usually shorten it, but my first one was this length and it was great for throwing over a shoulder or draping over your head. Anyway, here is where I need the pro’s help in figuring the “multiples” of the chain to shorten it.

Row 1. Dc across into foundation chain. Ch 3, turn.

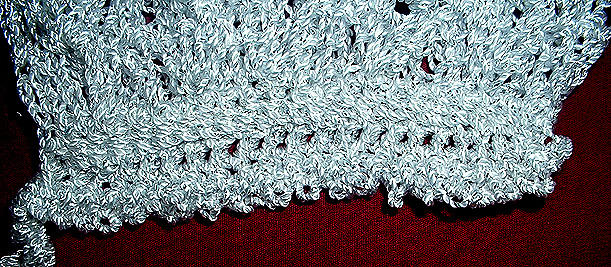
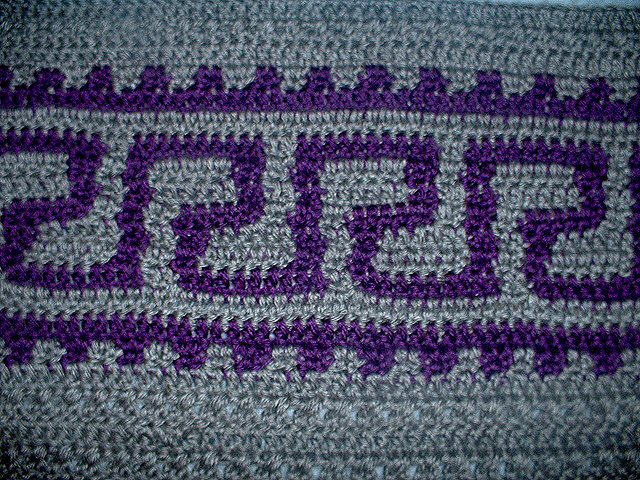
Row 2. Ch always counts as first stitch on the row. Dc crochet into the 2nd stitch from the chain stitch, skipping one DC. Then go to the skipped dc, and make a dc. It will cross over and look like an “X”. There’s a name for this stitch but I have forgotten it. Continue across the row, ch3, turn.

Row 3. Dc in all stitches across row, ch3, turn.
Row 4. Repeat Row 2
Row 5. Repeat Row 3
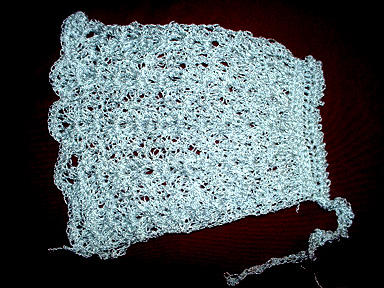
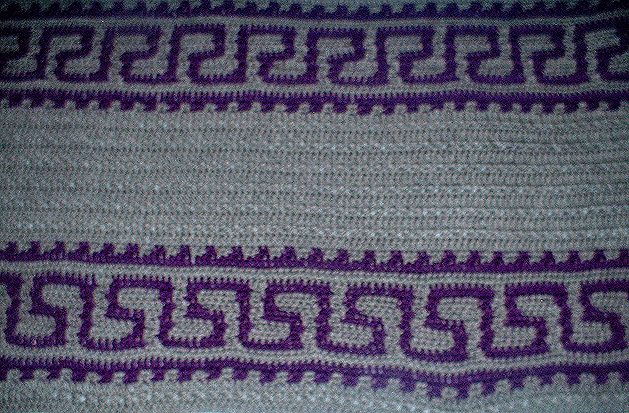
O.K. basically you are going to have a band of alternating two rows. One row of all DC, one row of the cross over stitch. You can make this band as wide as you like, just as long as you end with a row of all DC. Understand? I know I am not good at writing instructions so forgive my flaws with this and e-mail me for any questions. Be back shortly with part 2.

O.K., now that I have screwed up my blog entirely

Y'all bear with me, all the side stuff is at the bottom now and I'm trying to get it back to "normal". I am not good at customizing templates!! Anyway, I'm working on it!

Good morning! About the shawl.......

I have received SOOOO much lovely feed-back about this shawl. I had this pattern about 20 years ago, got it out of an old crochet book. It's just a counted stitch pattern so I'll try to write it up and post it.

Let me also say this. I am a private person most of the time and the charity work I do is anonymous. The only reason I told the story of my neighbor is to let y'all know that there are a lot of people on your own street who might just need a little chat, or a wave passing by, or just a little gift, unexpectedly, to really make a difference. I live in Mobile, Alabama, and there is a lot of poverty here. While I am not rich by any means, I am fortunate to be comfortable and my family safe. There are a lot of kids, old folks, abused women and children here that think just a small coverlet, a small hand-made toy, or a cap is a miracle.

I guess all I am saying is I am no angel. Ask my kids and friends! LOL! But just a small thing can make such a difference to someone who is lonely or hurting. That's all I was trying to say. So, thanks for all the kind words about the shawl and I will try to get the directions up as soon as possible.

Monday, August 01, 2005

Shawl modeled!


Posted by Picasa Here's the back

Posted by Picasa I usually make shawls longer than this but considering my daughter is 5'10" and the lady I made it for is very small, I figured it would be o.k.. I just ran it over to her and she just loved it! She wanted to know why and I told her that I didn't want her to think I had forgotten about her. I have not talked to her in a while and she lives alone. I rather love to suprise people with things than to wait for the holidys. She is 88 and chills easily and I know she gets lonely sometimes. Anyway, maybe do something for someone on your on street, 'specially if they are older. Elderly people are wise and know a lot and this lady used to be a nurse for over 60 years. At 88, her next day isn't promised to her, (well I guess it isn't to any of us! LOL), and I didn't want to regret "not getting around to it". Anyway, hope you like it!!

Tapestry shawl


Posted by PicasaThe picture and the pics below are of a tapestry shawl I made for an elderly neighbor. It works two thread at once during the design portion.

Close up of the design, a Grecian key.

tapestry Posted by Picasa

Monday, July 25, 2005

I have had luck in finding the pattern!

And thank you to all who have helped me in my quest, you know who you are!

Anyway, I am going to start this project and I am going to post every step of the way. Along with various other things, of course. Can't wait to get started, I have an idea what yarn I will use, probably the same as what I made my little phone case out of. we'll see. Anyway, thanks again!

Thursday, July 21, 2005

IN SEARCH OF THIS PATTERN

O.K., we are all looking for this pattern

http://creationsbytaz.com/

That IS an afghan, my friends!! LOL!! It's an Annie's Attic pattern, named Cathedral Rose Window Afghan. It's out of the book called Award Winning Afghans. So if any one has the pattern or knows where it can be bought, sing out!!

Posted by PicasaPouch with the phone. I wanted it to be exactly the size of the phone and was a little disappointed when it came out a bit larger but then I thought it was o.k. because I could put a little money in with it andmy I.D. and have everything I need. It needs to be blocked and shaped but I like it. :)

Posted by Picasa Here's the back, I put a little strap on it to go around my wrist. I started to do it elastic, but then decided to just make it long enough to twist a little.

My cell pnone pak


Posted by PicasaI got tired of running around with my cell phone clutched in my hand. I don't carry a purse or bag as such and I don't like sticking it in my pants pocket. So I made a little pouch for it last night. It's hard to see but there is a flap on it with a little loop. I am going to attach a pretty on it to go thu the loop to keep the phone secure.

O.k., now the second part of the pattern

Sorry for the delay, teen-ager problems. Anyway, here's the rest.

O.K., do both legs the same. Then you will have two little legs like my pic below.

Take one of the legs and find the inside seam. Slip stitch into the first stitch where the center seam is and work sc in the following 6 stitches.Turn.

Chain 1 sc across, turn.

This is where it becomes a bit murky. I like to do a couple of more rows here to leave a bit of "ease" in the crotch. If you like a tighter fit, keep it like this.

When done with desired amount of rows, sew (attach in desired way) to the 7 stitches on the inside of the other leg.

Now slip stitch into the begining stitch of the beginig row of the little crotch panel, this may read a little difficult but it's really easy. When the slip stitch is workrd, work a single crochet into the slip stitch and continue across the panel, onto the leg and continue around the whole garment, including the crotch panel in the back. Join into the sc at the end of row, ch1, turn.

Work into previous row all the way around again, and continue.

Now here's where you have so many choices. You can put a couple of fancy rows in, you can change to HDC, you can continue in sc, which makes a very solid material. You can increase 1 in every other row, if you want fuller pants prtion, or work straight up. You crochet until the body portion is the length you want, you can fold over the top and put wide elastic (in which case, I would suggest the sc, because it would hold a seam better when you make the casin) or you can put a draw string or ribbon in the top. You can continue on and put suspenders on it, or a bib. The possibilities are endless.

If these directions are hard to follow, I apologize. I have never written a pattern before. Please ask any questions you like.

First and MOST important.....

I want to say that my heart is with London. I have never had the pleasure of visiting there but have always wanted to. My sister went just a few months ago and told me how important "the tube" was to the British, virtually the main way of traveling. Where I live, I have no subway so I cannot realize this but I send so many good thoughts and prayers to the people of London. I cannot imagine the fear and dread these attacks provoke.

Wednesday, July 20, 2005

Here's the baby pants PATTERN! LOL!

I have had so many people ask about these pants and be so kind in their comments. I am going to post the pattern here. Here it goes.

I use Caron Simply Soft, with a size "G" or "H" needle. You can use just about any yarn, just use a larger or smaller needle accordingly.

Starting at the bottom of the pant, ch 27, slip st to the first chain. Ch 2

Work four rows of 1 sc in each stitch, then work 4 rows of HDC in each stitch. Chain 2 at the end of each row.

Starting on Row 9, increase 1 hdc in each side, every other row, until Row24.

O.K., that's the first leg, pretty simple huh?

Finished baby pants!


Posted by PicasaI finally got these finished, except for the ribbon throught the top, or elastic, I haven't really decided. These would be for 3-6 month, made with Caron Simply Softs Brites. They still need to be washed and blocked as well.

Monday, July 18, 2005

Kimono


Posted by PicasaLittle kimono gown I did, quite simple front and back, joined at the top. Only on one side because I am either going to put ribbon, or lacing or a snap on the other side for ease of changing. 3-6 month.

SOCKS! (not quite finished, of course!)


Posted by Picasa My first attempt at socks. Of course, I wasn't satisfied with the pattern I was working, so I modified it to a simpler stater, to me anyway! Anyway, here it is. I am doing a longer pair, with stripes.

Sunday, July 17, 2005

O.K., the baby pants as promised!!


Posted by PicasaThe baby pants are half done. I will finish them tomorrow. They will be 3-6 months size, done in Caron Simply Soft. Judith I haven't forgotten I promised you this pattern!

Saturday, July 16, 2005

MY FIRST JOURNEY INTO E-BAY!

O.K., I am curious. I admit it. So I have wandered into the murky waters of trying to sell on E-Bay.

http://cgi.ebay.com/ws/eBayISAPI.dll?ViewItem&item=4748636600&rd=1&sspagename=STRK%3AMESE%3AIT&rd=1

I just want to see how it goes. My husband has done quite well there, but as y'all know, handwork is really a different market. Well, we will see! If you have constructive criticism on the page, let me hear about it!

Friday, July 15, 2005

My daughter, my model!


Posted by Picasa Complete with faux hawk, she's going out tonight! I'll round her up to model for me tomorrw, as she models all my stuff!

without glasses Posted by Picasa

HEY, FOLKS!!

O.K., everything is as back to "normal" as it gets around here! I have the kimono gown done, I'll post pics tomorrow, also an interesting experiment in socks. Doing some adventure in snowflakes as well as dolls................a little bit of everything! Stay tuned and check back for lots of pics!

Thursday, July 07, 2005


Posted by Picasa

Here's the yarn!

Posted by Picasa
A close-up of this lovely yarn!

New baby poncho!


Posted by Picasa

This is a little baby poncho that came out of pure nervous energy! Just sat down and did it! I love the yarn, got it on E-Bay and here is the description:

"There are two - 2 ply skeins in this auction for a total of 109 yards...1st skein is 64 yards and the 2nd skein is 45 yards and 8 WPI of mixed wool. The 1st ply has some mohair, correidale, border leciester, and merino. The 2nd ply is a commercial fine thread yarn with little flowery poofs that embellish the yarn throughout. "

It really makes up well.

O.K., I'm going to quit stroking now! LOL!

I have the "Hurricane Mindset" now, put the plywood up, tie everything down you can, put the cars as close to the house as possible and hold on!! LOL!

As the link below is a live link, the map will change as the forecast changes.

Now, I did a little baby poncho last night I am going to throw the pic up, maybe you will like it!

Tuesday, July 05, 2005

Tropical Storm Cindy

Well, aside from crochet for a moment. We have a tropical storm coming in tonight, where I am, in Mobile, Alabama, we are in the east side. We are going to get a lot of rain and a little wind. But Dennis, the next one, is the one I am looking at. It is supposed to be in the Gulf, right below us, next week, with winds of over 100 m.p.h., awfully early in the year for all of this. Keep good thoughts for us this year, please, we had an awful season last year.

AMIGURUMI!

Oh no, I have just discovered these sweet toys! Where am I gonna find the time?

Everyone who has asked for patterns or e-mailed me, I'm sorry to be long in replying. I will try my best to answer ALL e-mails and posts today or tonight.

Anyone that has patterns or does this AMIGURUMI please post!! I want to hear from you!!

Monday, July 04, 2005

MORE TO COME!!

I'm on a roll now! LOL! Anyway, I have a beaded sweater to finish, another pair of pants that are striped and the "fishscale" top won't take long. So I'll be putting more pics up tomorrow. Check back if you like! It's too hot to bar-be-que!

Posted by Picasa
Remember the "fishscale" sequins from the post below? Well, these are the closest things I can find in town to the ones on the top below. I am going to have to order them off the web, but untill then, I am going to use these. At least the thread is right!

Posted by Picasa
Close-up of the leg. If I were going to do just a cuff, I think, next time, I would do two strands together to produce a fluffier cuff. But I had in mind to do the whole pant, so that will be the next pair!

Posted by Picasa
Remember the pants below that had the beads on the one leg? Well, I took the beads off, and started to overlay the specialty yarn. I was going to do the whole garment until my hubby said he liked them like this. He said they look like ski pants. Well, I have lived in the South all my life, so I don't know about ski pants, but I think I would have done another colour if I was thinking of just doing cuffs. So I probably will go ahead and cover them but wanted to show the idea.

Posted by Picasa
A look inside the jacket. Doing an overlay also keeps the inside of the garment from being fuzzy as the outside. It cuts the bulk. You can't really see it well, but I thought I would throw it up here.

In Progress


Posted by Picasa

O.K., here's the fun fur jacket. I did a sweater, and I am doing an overlay technique to add the fun fur. This way, I can make sure I don't drop stitches, which are the biggest problem working with fun fur, even if you have it combined with a main thread. Plus, you can control the pattern of it. Like in this stage, I could leave this as it is, and it looks like a Bohemian style Beat jacket from the Sixties. But I am going to complete the sleeves so the whole coat will be the same. This project took approximately 2/3 skein of Caron's Simply Soft for the sweater, and two skeins of the Fun Fur for the overlay. I don't know whether the overlay takes more or less time, but it is less frustrating to me.

Saturday, July 02, 2005

Y'all Gotta See This!!

I'm not gonna post tomorrow (Saturday) and maybe Sunday because I am working on some wild baby clothes!! My step-daughter is bringing her almost three-month old over this week-end and I want to try and have some things finished so I can try them on Nicole (the baby) and get some pictures with them really on a baby! LOL!

I went to Hobby Lobby today and picked up a few things but cannot find the sequins I need ANYWHERE in this city. I tried Michael's as well, Hancock's and JoAnn's are next I guess. I have been sent a link where I can buy them on-line, but I really wanted to find them nearby. Oh well, that's life.

Y'all check back anytime, but Sunday evening or Monday I will have some really Kickin stuff up!

Enjoy your holiday!!